Configure VPN app mappings for iOS, macOS, and Windows devices
You can configure VPN connections on managed iOS, macOS, and Windows devices so that they are established on a per-app basis. This allows you to have more control over data that goes through VPN. Use this feature to, for example, separate the transfer of personal and business data, while ensuring their integrity.
|
|
IMPORTANT: iOS and macOS devices only: Only the apps that currently exist in the KACE Cloud App Library are available for selection. This feature does not support custom apps. |
Start by creating per-app VPN mappings in the Library for an existing VPN configuration. Next, apply that configuration to one or more devices, either directly, or through KACE Cloud policies. For details on how to create, manage, and apply VPN configurations, see Create or edit VPN configurations in the Library and Manage VPN configurations on iOS and macOS devices.
Any VPN configuration that includes one or more custom app mappings is marked with a gear icon in the library.

Per-app VPN on Windows has some operational differences due to device limitations. On a managed Windows device, when an app that is included in the mapping starts, it attempts to launch and use the associated VPN as expected. However, if that VPN is not configured properly and cannot be used, the app attempts to use another network connection. On iOS and macOS devices, the app is blocked if it cannot connect to the selected VPN.
This feature can only be used for VPN configurations that use the following connection types:
- iOS and macOS devices: All available connection types are available, except L2TP, PPTP and L2TP, PPTP and Custom SSL.
- Windows devices: Only the following connection types are supported: IKEv2, PPTP and L2TP.
|
|
NOTE: Support for native Android per-app VPN is not currently available. Some Android apps, such as Cisco AnyConnect, include support for per-app VPN. While you can use a wide range of VPN apps on managed Android devices, their per-app VPN settings cannot be managed in KACE Cloud using this method. Instead, you can modify the VPN app settings in the Library. For more information, see Getting started to manage Android, iOS, and macOS apps. |
To create or edit app VPN mappings for a VPN configuration in the Library:
- Select the Libraries tab in top navigation.
- Click the VPN icon.
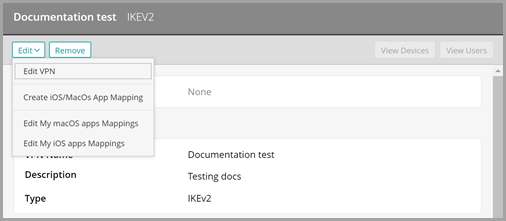
- Select a VPN configuration in the list.
You must select a VPN configuration that uses the IKEV2 connection type. Other connection types are not supported.
- Complete one of the following steps:
- To create a new app mapping for iOS and macOS devices, in the right-hand panel, choose Edit > Create iOS/macOS App Mapping.
- To create a new app mapping for Windows devices, in the right-hand panel, choose Edit > Create Windows App Mapping.
- To edit an existing app mapping, in the right-hand panel, choose Edit > Edit app mapping.
- iOS devices only.
- In the window that appears on the right, provide the following information, as applicable:
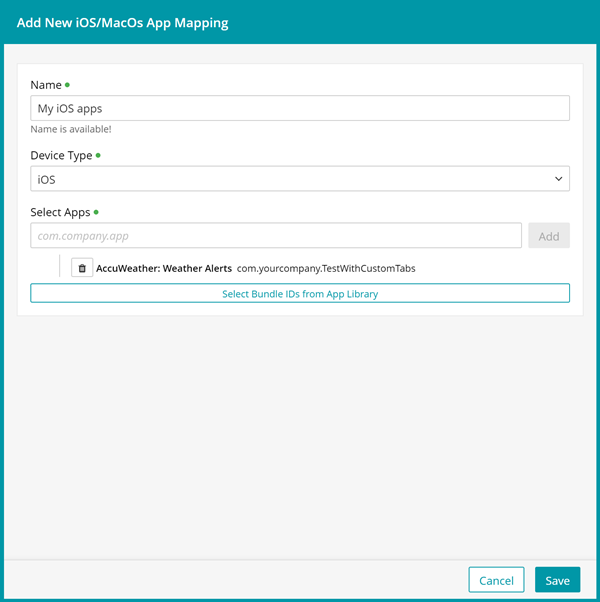
- Name: Type a unique name for this mapping.
- Device Type: Select iOS.
- Click Select Bundle IDs from App Library.

IMPORTANT: Only the apps available in the KACE Cloud App Library are available for selection. This feature does not support custom apps.
- In the list of apps that appears, select one or more apps, as applicable. Next, click Add Bundle ID.
The list of apps closes and the selected apps appear listed just above the Select Bundle IDs from App Library button.
- In the window that appears on the right, provide the following information, as applicable:
- macOS devices only.
- In the window that appears on the right, provide the following information, as applicable:
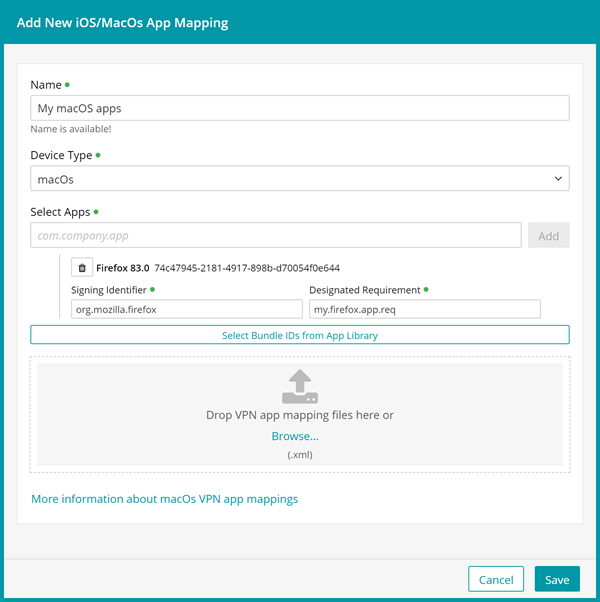
- Name: Type a unique name for this mapping.
- Device Type: Select macOS.
- Click Select Bundle IDs from App Library.
IMPORTANT: Only the apps available in the KACE Cloud App Library are available for selection. This feature does not support custom apps.
- In the list that appears, select one or more apps, as applicable. Next, click Add Bundle ID.
- Collect information about the selected apps. You must provide a Signing Identifier and Designated Requirement for each macOS app that you want to map. You also need to specify the app Identifier if you choose to provide a VPN mapping XML file.
To do that, use the codesign tool from within a terminal window on a macOS that has the app installed:
codesign --verbose -dr - /Applications/Some\ Application.app
This command displays the values required for Some Application app. For example:
Executable=/Applications/Some Application.app/Contents/MacOS/Some Application
Identifier=com.some.application
CodeDirectory XXXX
Signature size=9999
Timestamp=Jan 01, 1901 at 12:00:00 PM
Info.plist entries=99
TeamIdentifier=XXXXXXXXXX
Runtime Version=1.0.0
designated => identifier "com.some.application" and certificate leaf[subject.OU] = ABCDEFGHIJ
In the above example, the Identifier and SigningIdentifier are com.some.application and come from the second line of the command output. These two values are almost always identical.
The DesignatedRequirement is the value from the last line:
identifier "com.some.application" and certificate leaf[subject.OU] = ABCDEFGHIJ
For more information about macOS code signing, see https://developer.apple.com/support/code-signing/.
- Complete one of the following steps:
- Provide the following information:
- Signing Identifier: Type the unique identifier string for this app that is embedded in the code signatures. Code requirements are the rules macOS uses to evaluate a code signature. For instructions on how to obtain the Signing Identifier for the selected app, see step a.
- Designated Requirement: Type the information that identifies the particular piece of code. Any two pieces of code that with the same Designated Requirement (DR) are considered to be the same code. The DR typically includes a rule specifying the required value of the signing identifier. For instructions on how to obtain the Designated Requirement, see step a.
- Create a VPN mapping XML file, and navigate to the file in the indicated area.
The following XML is an example of what a VPN app mapping XML file may look like. Use it only as a guideline on the file structure and syntax. The values in this example are not valid. You must specify the Identifier, Signing Identifier and Designated Requirement associated with the macOS app, as indicated in step a.
<?xml version="1.0"?>
<Apps>
<App>
<Identifier>com.some.application</Identifier>
<SigningIdentifier>com.some.application</SigningIdentifier>
<DesignatedRequirement>SomeLongStringA</DesignatedRequirement>
</App>
<App>
<Identifier>com.another.application</Identifier>
<SigningIdentifier>com.another.application</SigningIdentifier>
<DesignatedRequirement>AnotherLongString</DesignatedRequirement>
</App>
</Apps>
- Provide the following information:
- Collect information about the selected apps. You must provide a Signing Identifier and Designated Requirement for each macOS app that you want to map. You also need to specify the app Identifier if you choose to provide a VPN mapping XML file.
- Windows devices only.
- In the window that appears on the right, provide the following information, as applicable:
- Name: Type a unique name for this mapping.
- File path: Type the file path to the app on target Windows devices. For example: C:\Program Files (x86)\Internet Explorer\iexplore.exe.
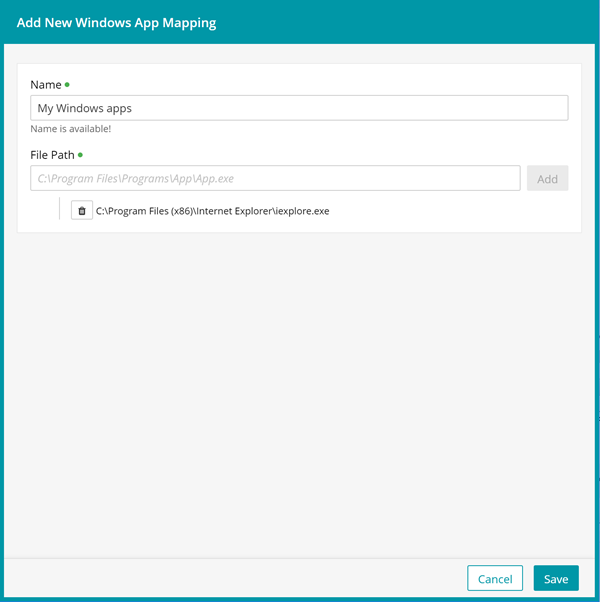
- Click Add
- In the window that appears on the right, provide the following information, as applicable:
- Add more apps to your VPN configuration, as required.
- Click Save.
Next, you can associate the newly created app mapping with managed devices. For more information, see Manage VPN app mappings on iOS, macOS, and Windows devices.